Preparing for postpartum hemorrhage (PPH)
PPH setup: Internal blood tank with vaginal bleeding
CAUTIONS
During the simulation, do not press Deliver now if a user has their hands inside of the Patient Simulator.
Before starting the PPH scenario, make sure to remove the breech or cephalic delivery module from the Patient Simulator.
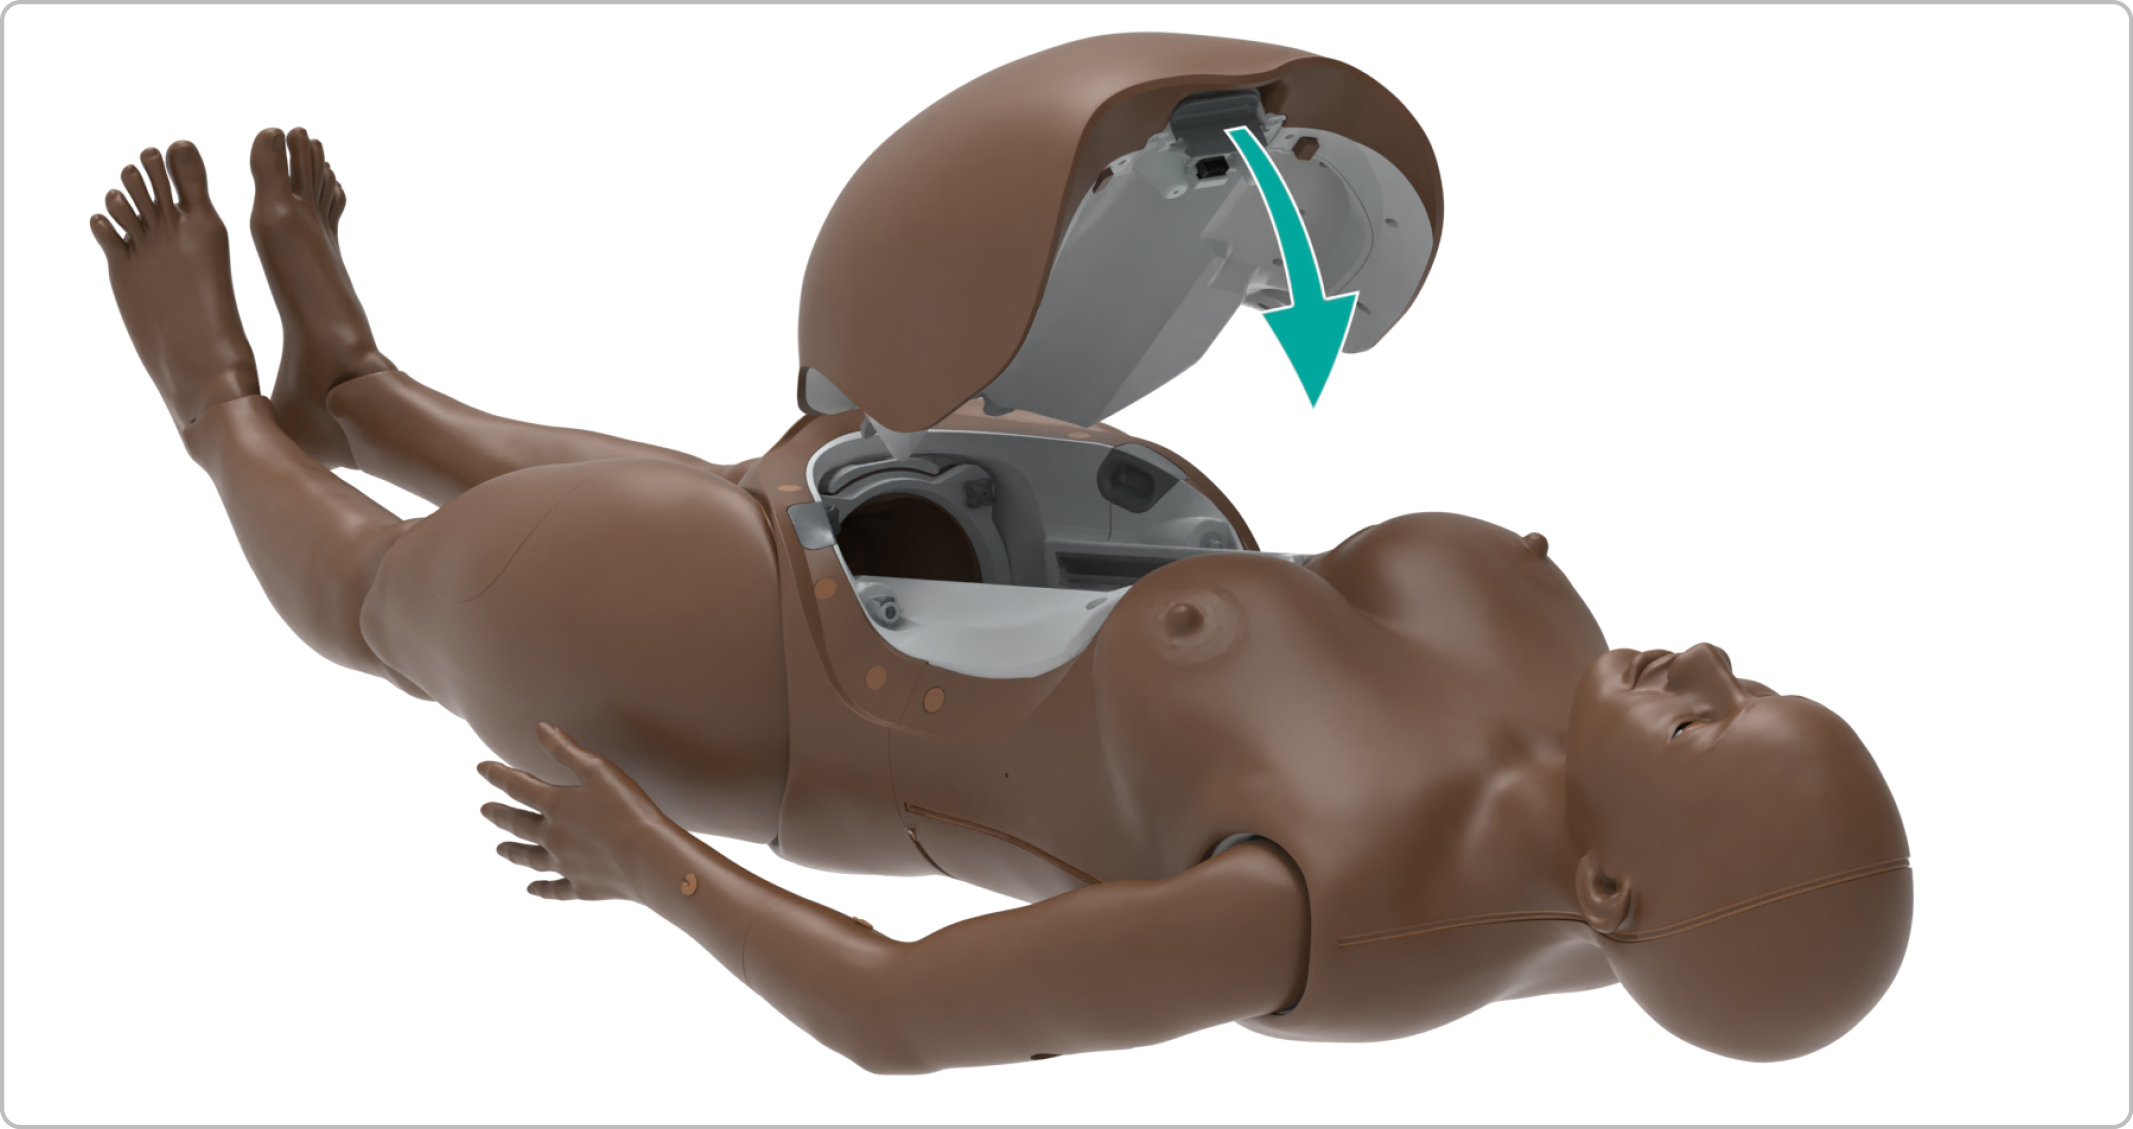
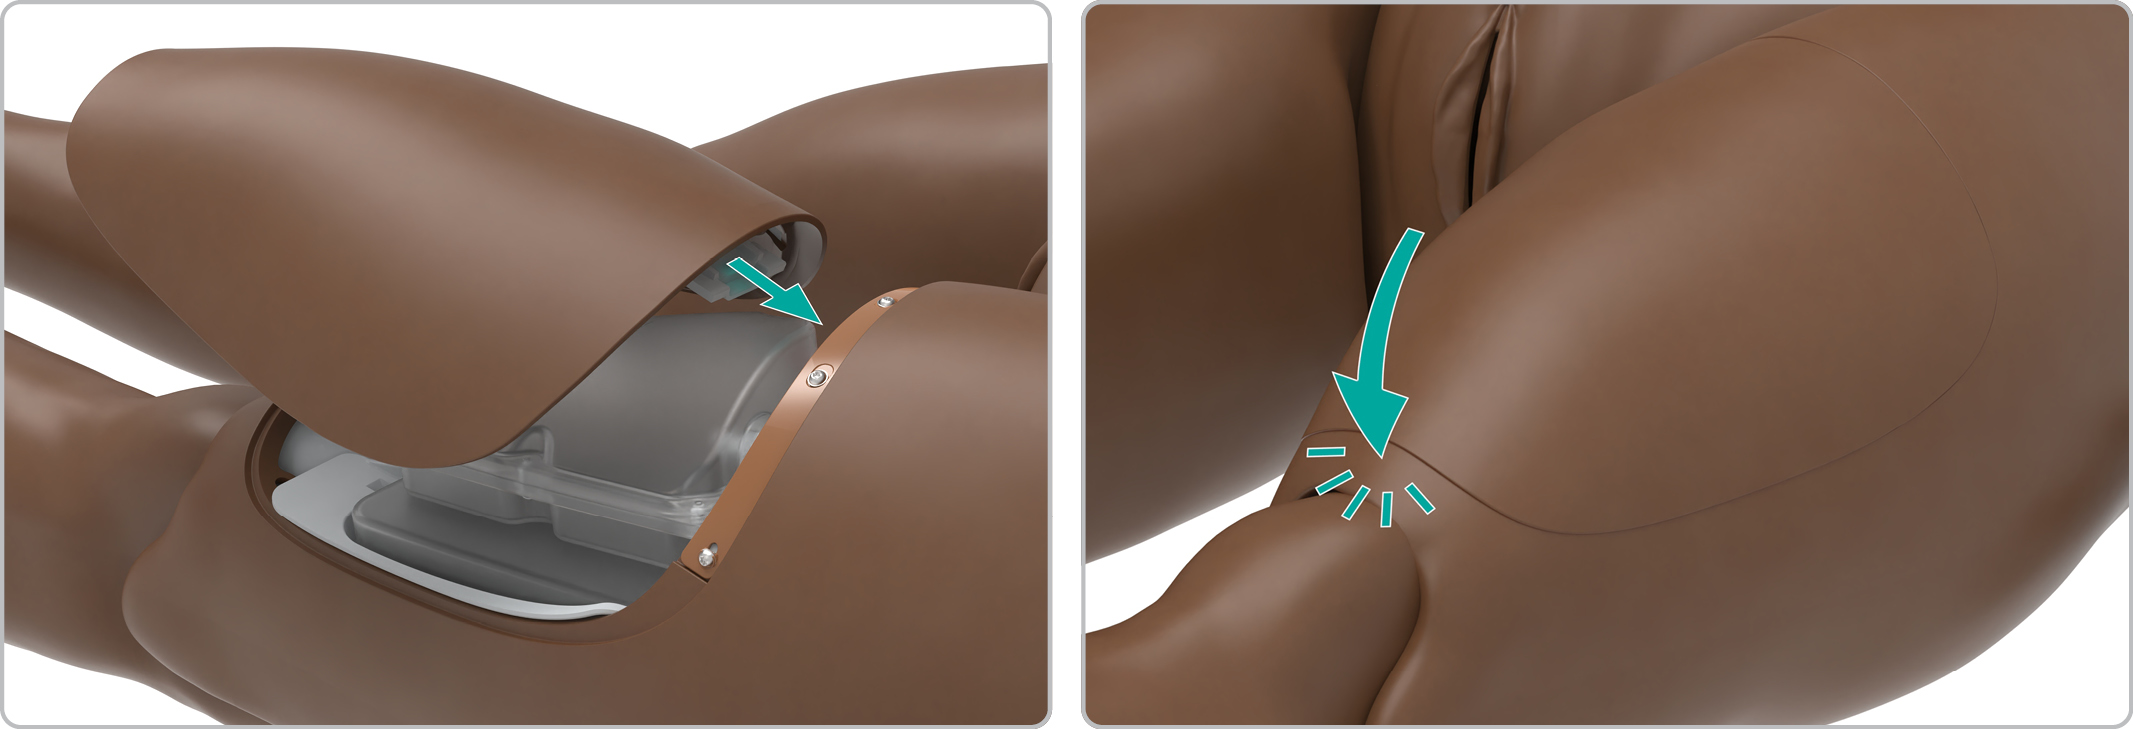
Opening the abdomen
Open the simulator's abdomen.

CAUTION
Avoid damaging any internal components during this step.
NOTE
The delivery module carriage should be at the back of the birthing chute. If not, close the abdomen, check that LLEAP is connected and wait for 2 minutes while the delivery module carriage backs up to its default position.
Installing the uterus
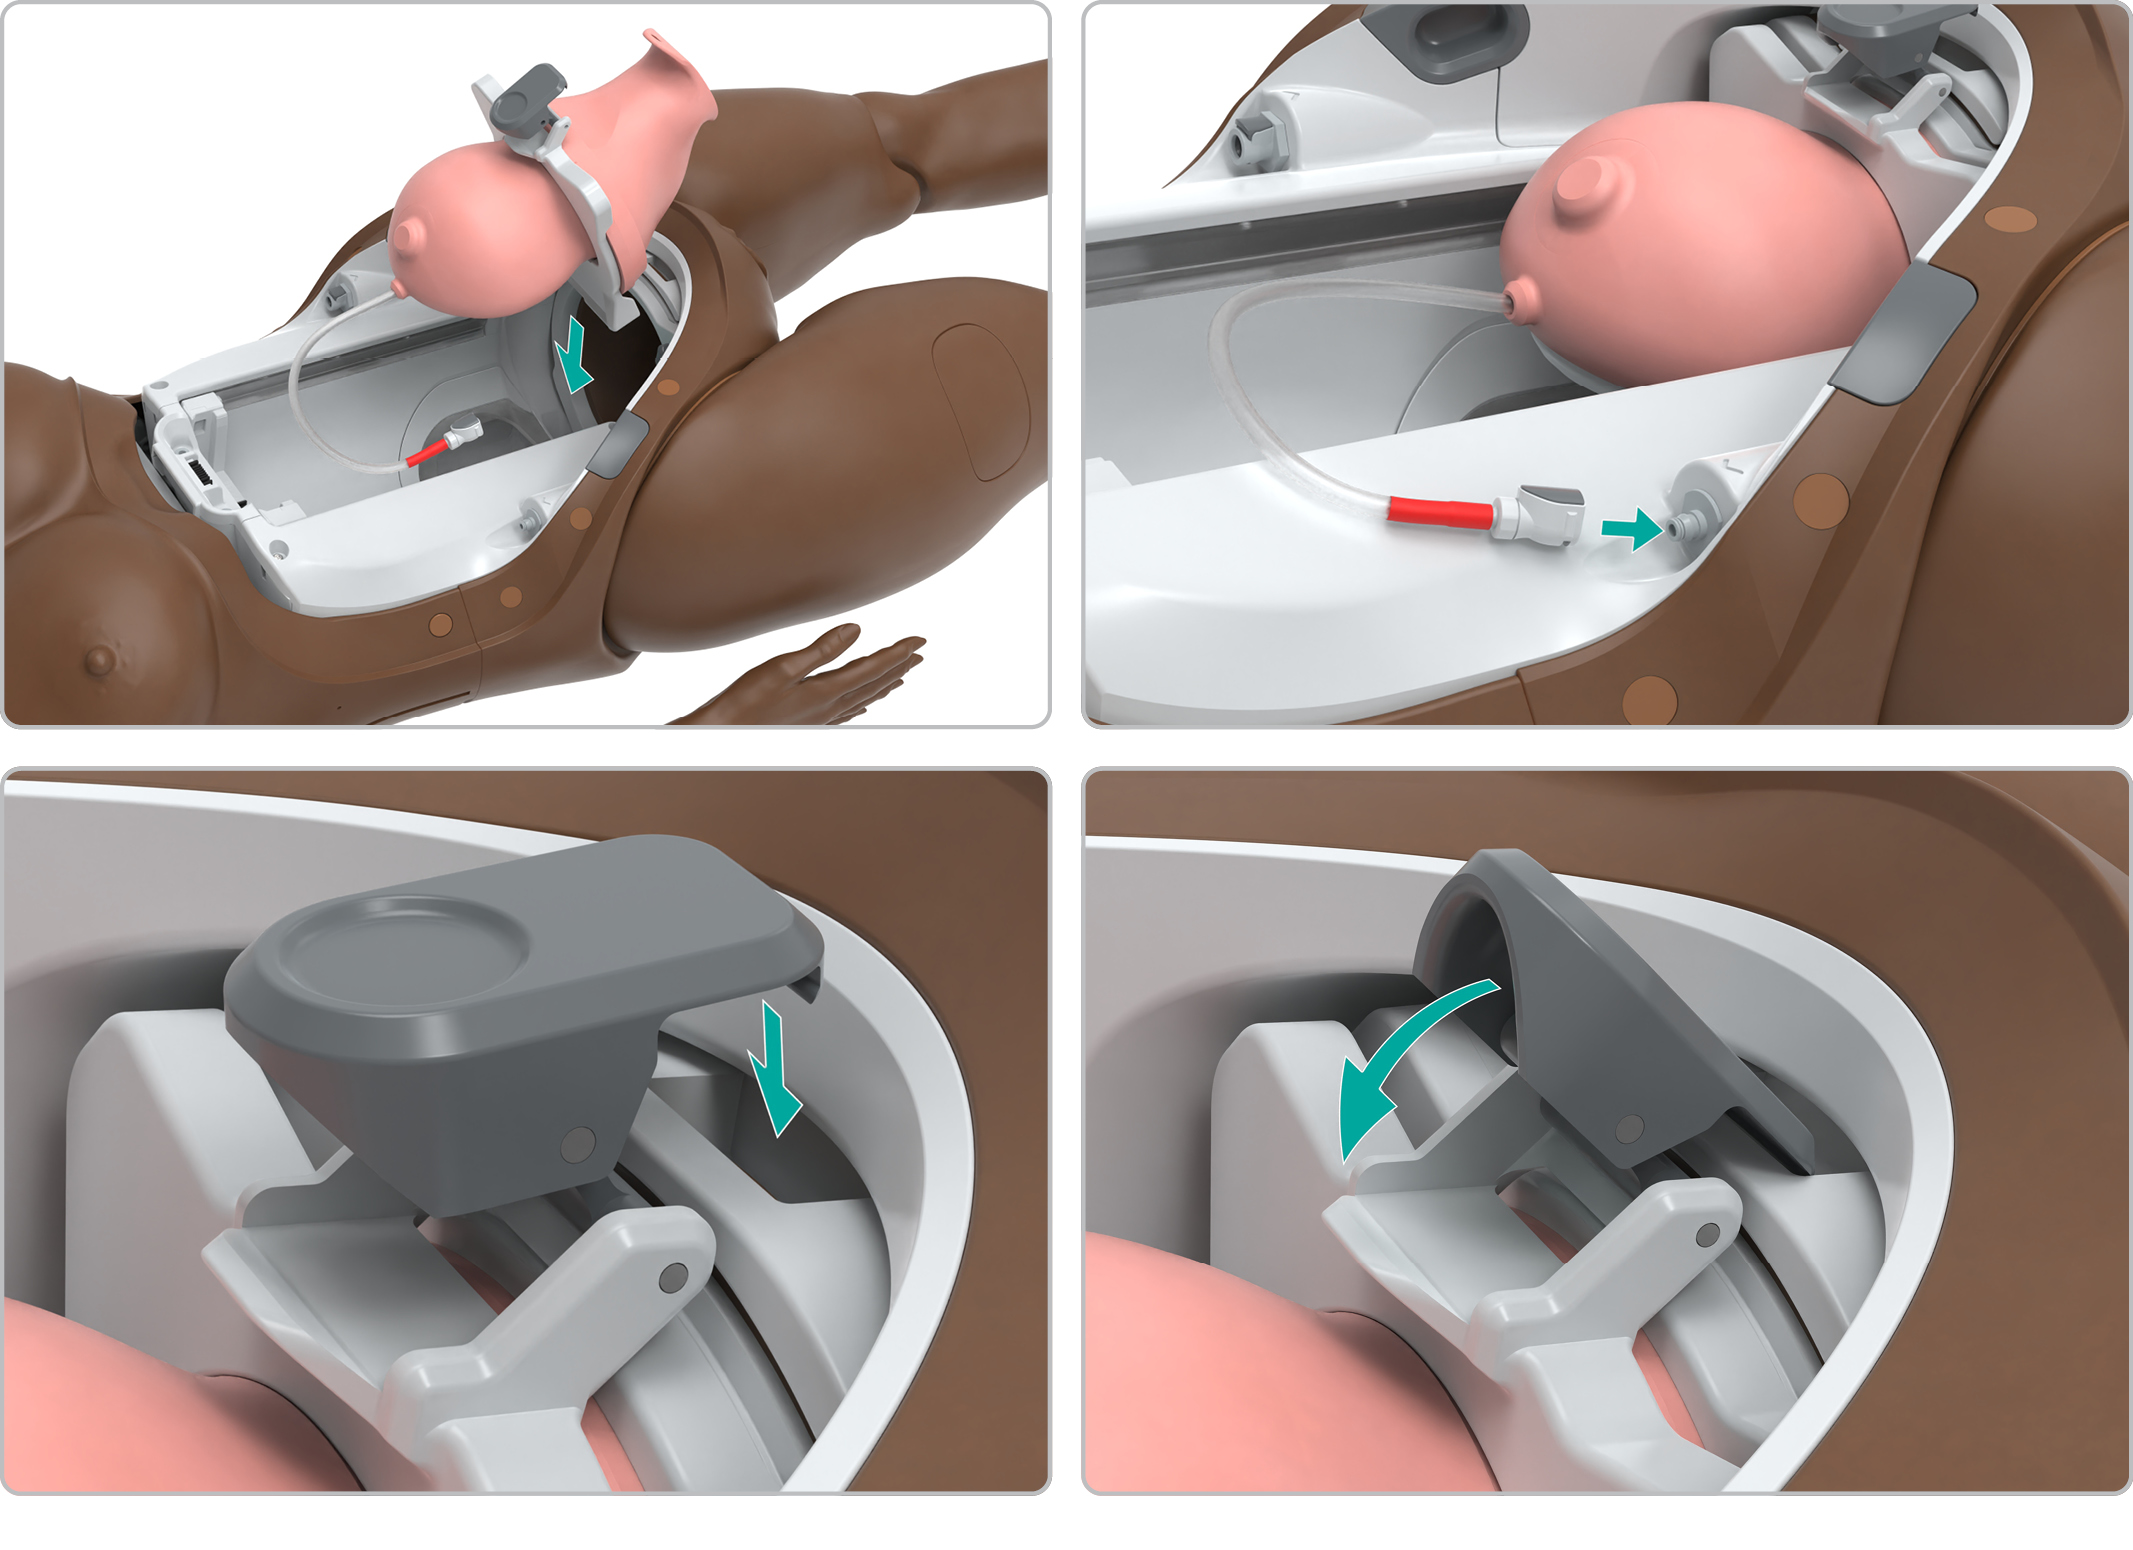
Remove the cephalic or breech delivery modules if they are inside the Patient Simulator.
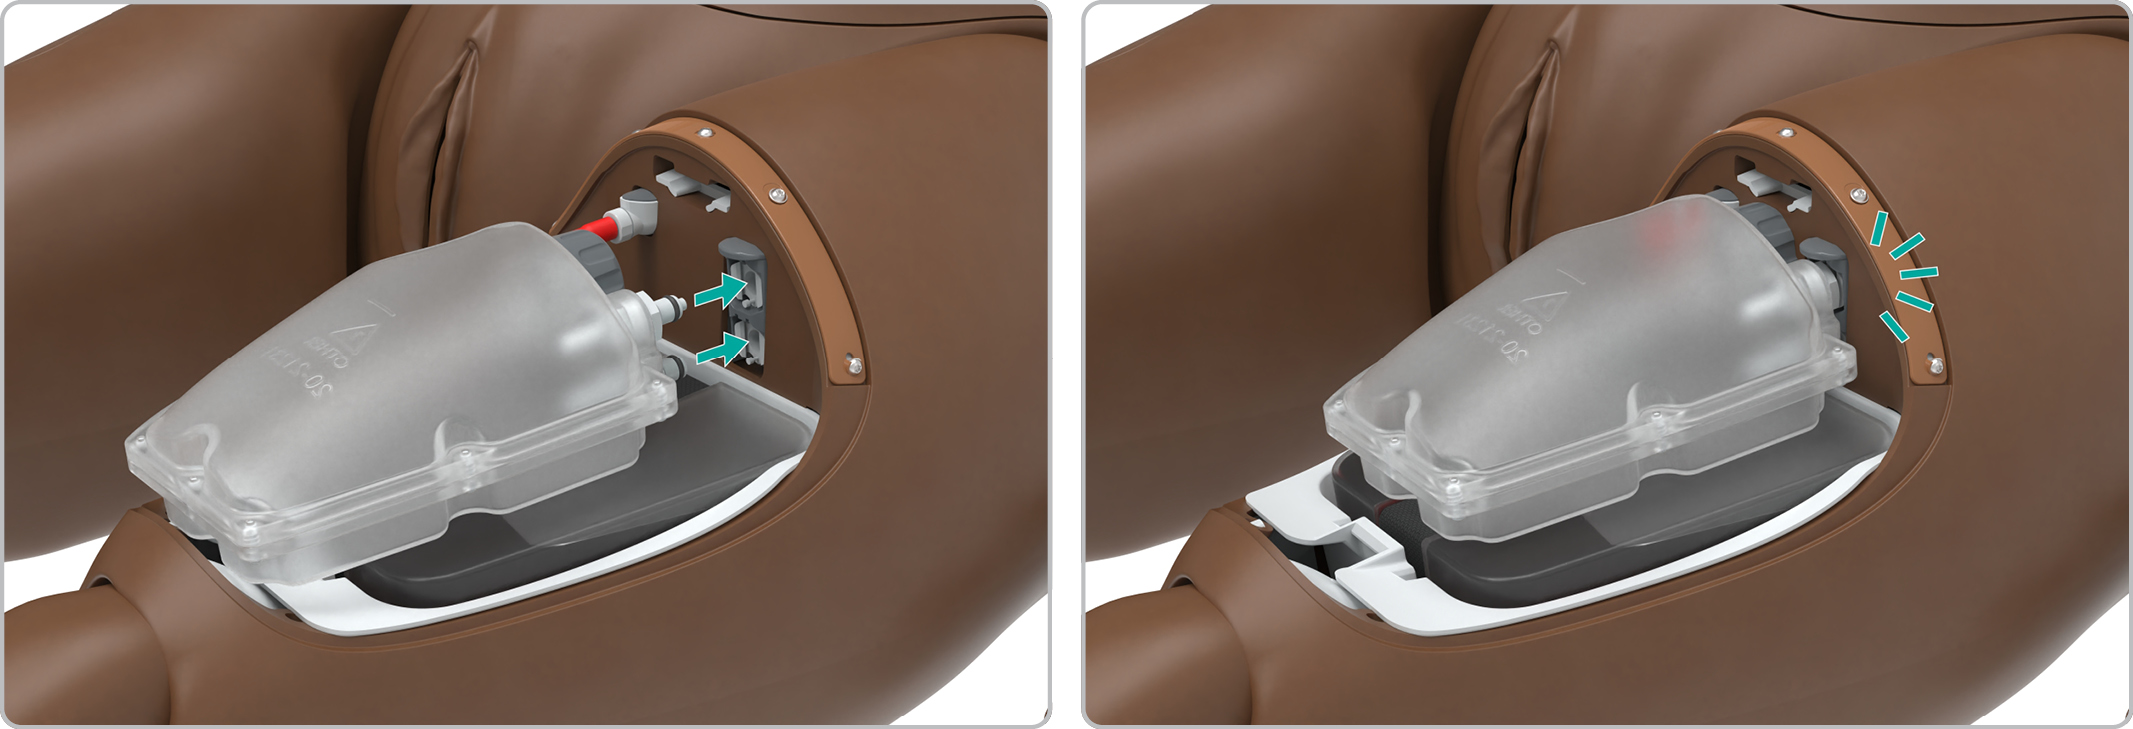
Insert the uterus inside of the abdomen.
Connect the uterus tube to the blood outlet port.
Clip the uterus to the retention ring.
Fasten the clip.
CAUTION
If the uterus is improperly placed, blood can leak inside of the simulator and damage the electronics. Use the guiding plastics on the uterus to create a tight seal.
NOTES
To get the correct assembly of the uterus, vagina, and urethra, the parts need to be lined up. There is a fold on the top of the uterus that should be drawn up the urethra.
Before starting PPH with the uterus, incline the Patient Simulator. This will allow the blood to properly flow out of the simulator.
Closing the abdomen
Align the abdomen toe-ins with the inserts inside the simulator.
Push down to clip the abdomen on the simulator.
CAUTION
Avoid damaging any internal components during this step.
NOTE
The delivery module carriage should be at the back of the birthing chute. If not, close the abdomen, check that LLEAP is connected and wait for 2 minutes while the delivery module carriage backs up to its default position.
Filling the internal blood tank
Unlatch the thigh lid by pulling the release lever under the skin above the knee.
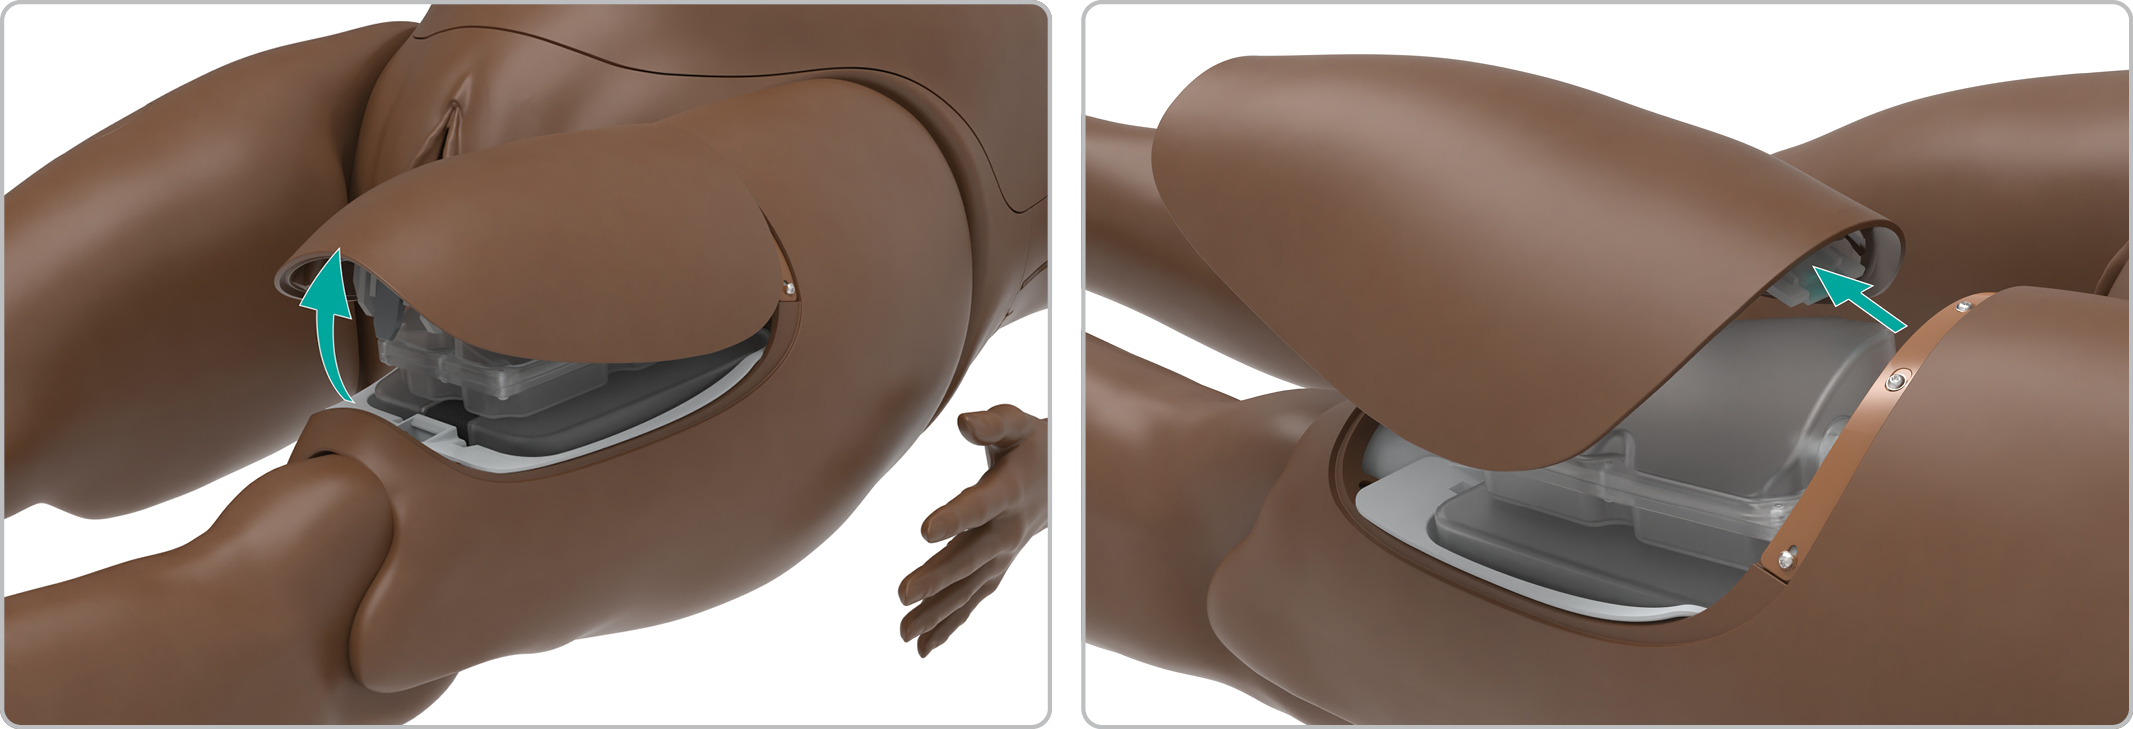
Unclip the internal urine tank by pressing the release button on the right side of the connection point.
Remove the urine tank.
Disconnect the internal blood-tank tube from the leg.
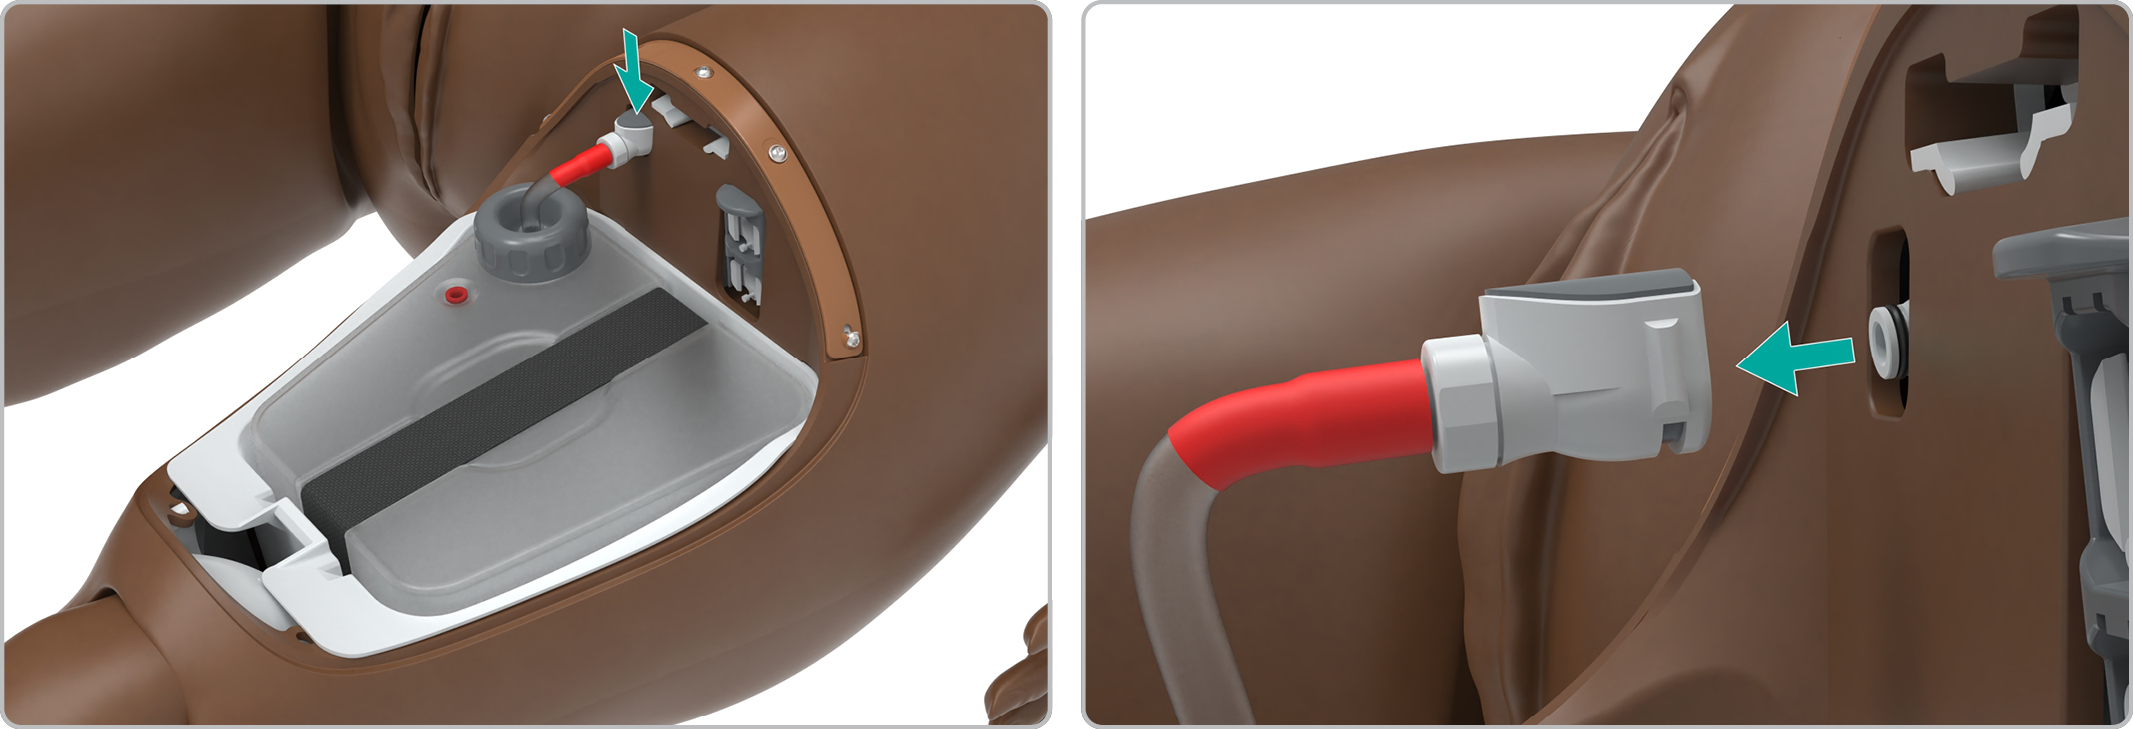
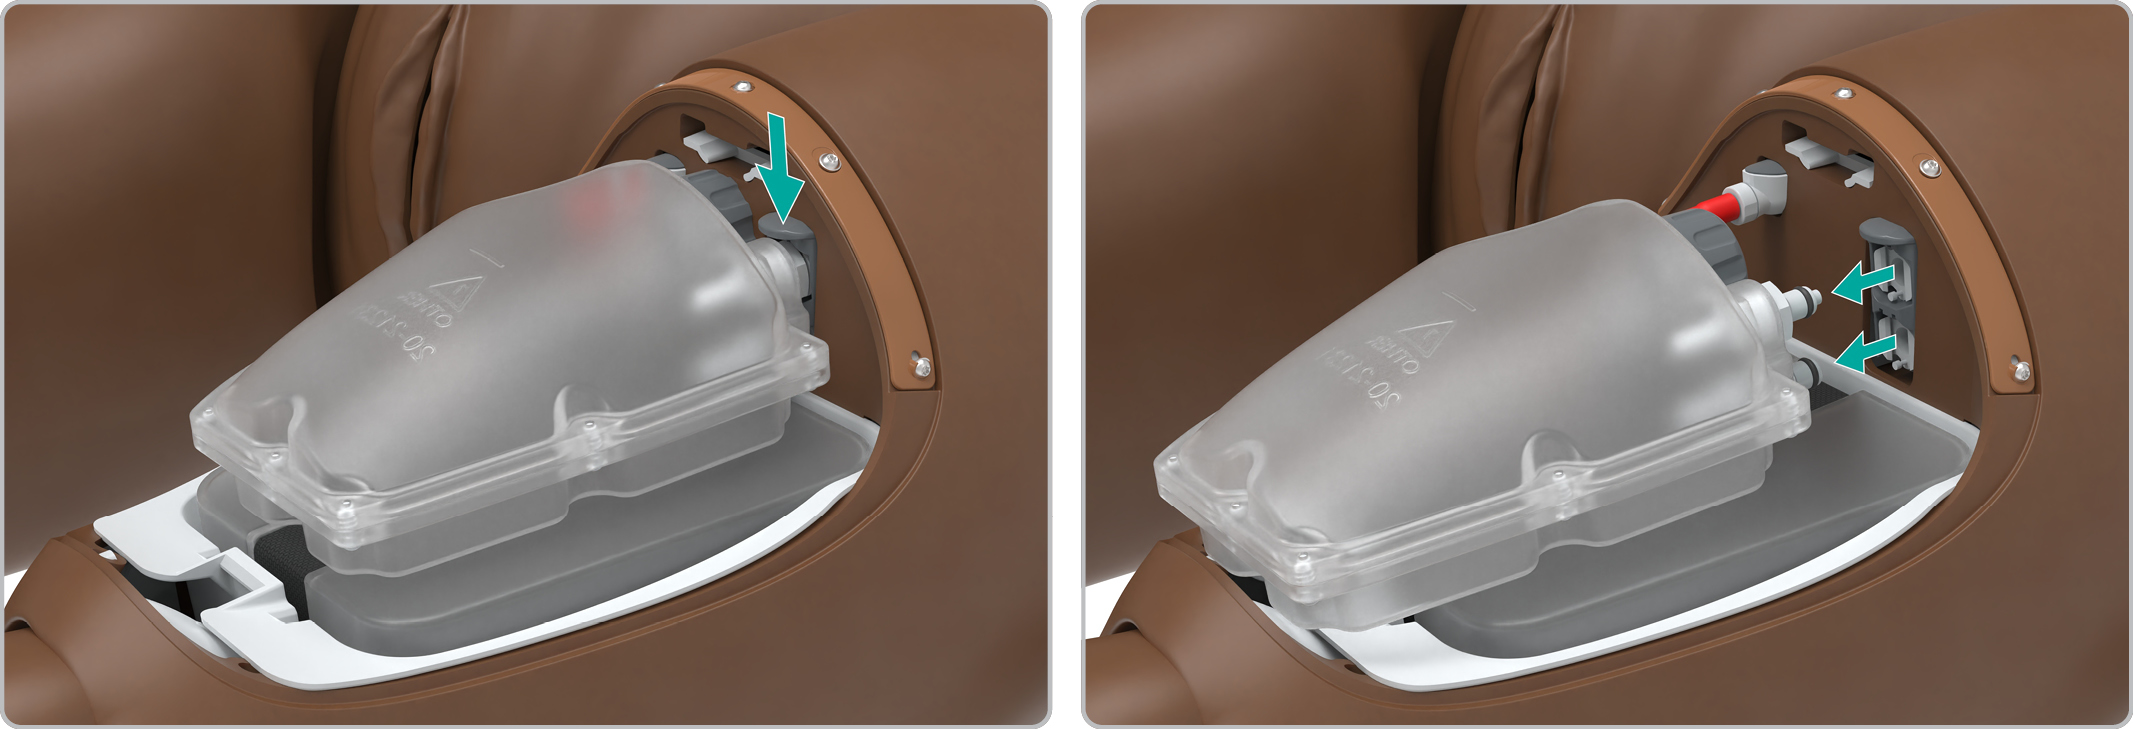
Remove the internal blood tank and fill it with a mixture of simulated blood and distilled water.
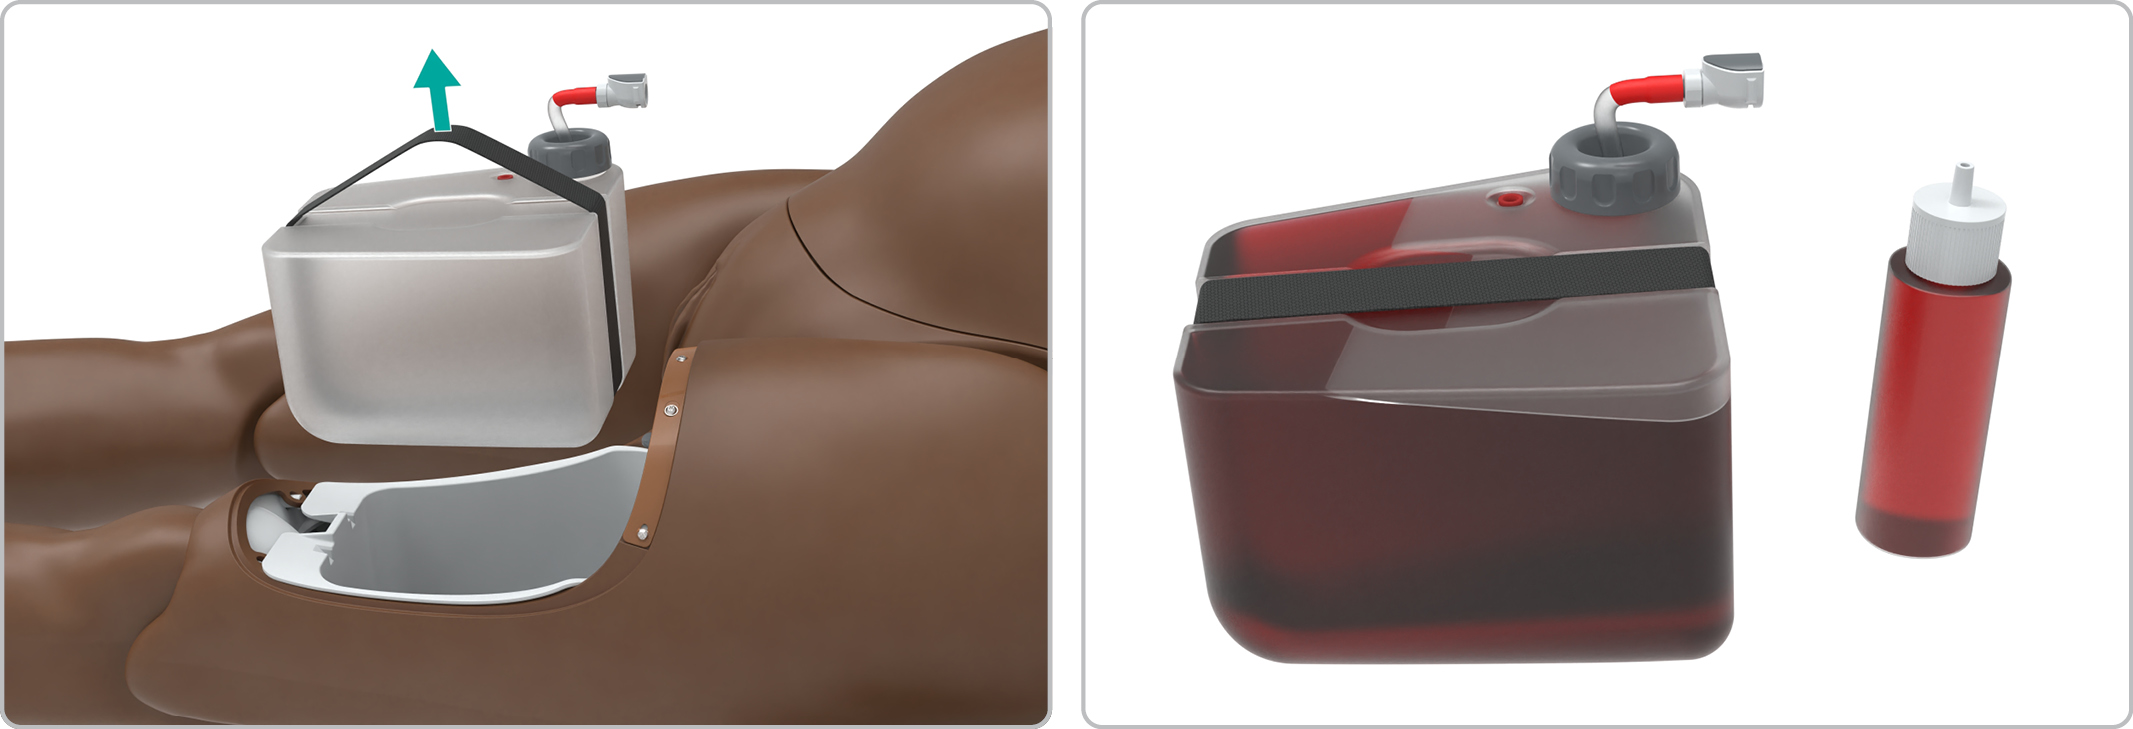
Close the internal blood tank and put it back inside the thigh.
Connect the internal blood-tank tube to the leg.
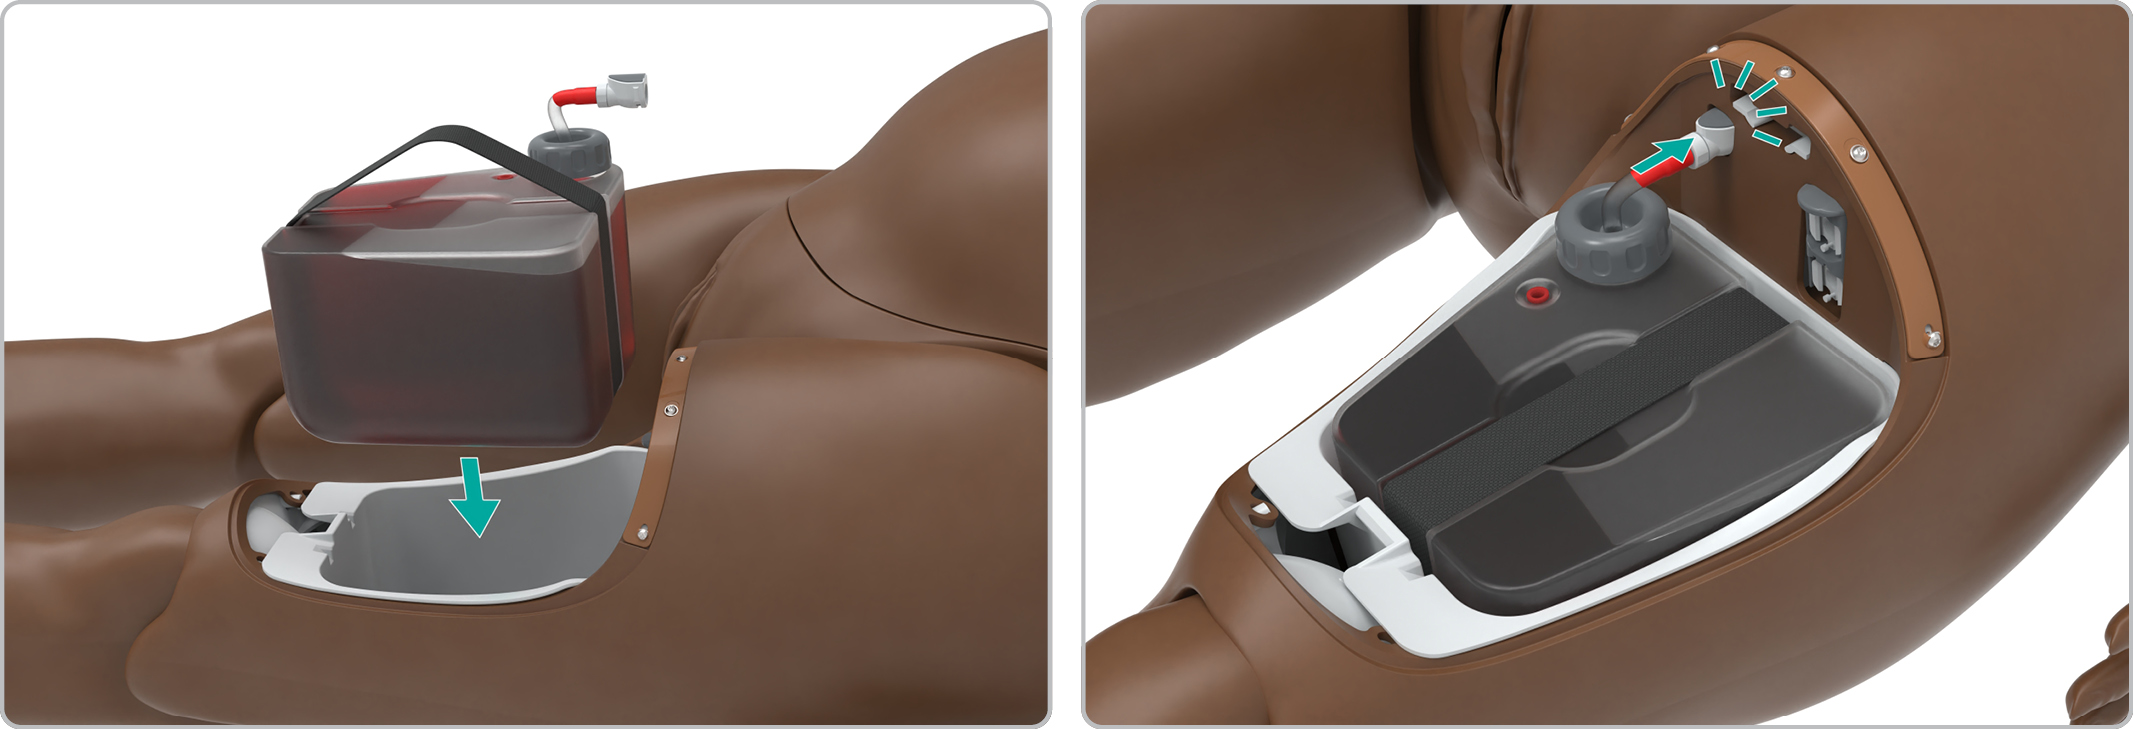
Place the urine tank back inside the thigh and push to clip it in.
Close the thigh lid.
NOTE
To control the vaginal bleeding, make sure the perineum is properly attached to the pelvis by connecting the fluid connectors near the urethra.
PPH setup: External blood tank with vaginal bleeding
CAUTIONS
During the simulation, do not press Deliver now if a user has their hands inside of the Patient Simulator.
Before starting the PPH scenario, make sure to remove the breech or cephalic delivery module from the Patient Simulator.
Opening the abdomen
Open the simulator's abdomen.
CAUTION
Avoid damaging any internal components during this step.
NOTE
The delivery module carriage should be at the back of the birthing chute. If not, close the abdomen, check that LLEAP is connected and wait for 2 minutes while the delivery module carriage backs up to its default position.
Installing the uterus
Remove the cephalic or breech delivery modules if they are inside the Patient Simulator.
Insert the uterus inside of the abdomen.
Connect the uterus tube to the blood outlet port.
Clip the uterus to the retention ring.
Fasten the clip.
CAUTION
If the uterus is improperly placed, blood can leak inside of the simulator and damage the electronics. Use the guiding plastics on the uterus to create a tight seal.
NOTES
To get the correct assembly of the uterus, vagina, and urethra, the parts need to be lined up. There is a fold on the top of the uterus that should be drawn up the urethra.
Before starting PPH with the uterus, incline the Patient Simulator. This will allow the blood to properly flow out of the simulator.
Closing the abdomen
Align the abdomen toe-ins with the inserts inside the simulator.
Push down to clip the abdomen on the simulator.
CAUTION
Avoid damaging any internal components during this step.
NOTE
The delivery module carriage should be at the back of the birthing chute. If not, close the abdomen, check that LLEAP is connected and wait for 2 minutes while the delivery module carriage backs up to its default position.
Filling and connecting the external blood tank
Fill the external blood tank with some concentrated blood and distilled water and close it.
NOTES
Make sure the tube inside the external blood tank is attached to its deadweight and the cap before closing.
The external blood tank can be hung on the bed or placed on the floor.
Lift the left arm of the Patient Simulator.
Unzip the torso skin.
Unplug the torso skin.
Connect the tube labelled External blood tank to the Patient Simulator’s blood inlet port.
Route the tube inside the torso skin.
Plug the torso skin back in.
Zip the torso skin with the tube inside.
Put the arm back in its position.
NOTE
To control the vaginal bleeding, make sure the perineum is properly attached to the pelvis by connecting the fluid connectors near the urethra.
Removing the uterus
Unfasten and remove the clip from the retention ring.
Disconnect the uterus tube from the blood outlet port.
Remove the uterus from the abdomen.
CAUTION
When removing the uterus, make sure to clean any blood that may flow out and into the abdomen, as this can damage the electronics inside of the birthing chamber.
PPH setup: Internal blood tank with Clean Bleed™ Mat
CAUTIONS
During the simulation, do not press Deliver now if a user has their hands inside of the Patient Simulator.
Before starting the PPH scenario, make sure to remove the breech or cephalic delivery module from the Patient Simulator.
Connecting the Clean Bleed™ Mat
Insert an absorbent pad inside the Clean Bleed™ Mat.
Close the Clean Bleed™ Mat.
Place the Clean Bleed™ Mat underneath the Patient Simulator.
NOTE
Make sure the Clean Bleed™ Mat blood inlet port is aligned with the Patient Simulator's blood inlet port.
Lift the right arm of the simulator.
Unzip the torso skin.
Unplug the torso skin.
Connect the tube labelled Clean Bleed™ Mat to the simulator’s blood outlet port.
Route the tube inside the torso skin and plug back the torso skin.
Zip the torso skin with the tube inside.
Connect the Clean Bleed™ Mat to the Clean Bleed tube.
Put the arm back in its position.
Filling the internal blood tank
Unlatch the thigh lid by pulling the release lever under the skin above the knee.
Unclip the internal urine tank by pressing the release button on the right side of the connection point.
Remove the urine tank.
Disconnect the internal blood-tank tube from the leg.
Remove the internal blood tank and fill it with a mixture of simulated blood and distilled water.
Close the internal blood tank and put it back inside the thigh.
Connect the internal blood-tank tube to the leg.
Place the urine tank back inside the thigh and push to clip it in.
Close the thigh lid.
PPH setup: External blood tank with Clean Bleed™ Mat
CAUTIONS
During the simulation, do not press Deliver now if a user has their hands inside of the Patient Simulator.
Before starting the PPH scenario, make sure to remove the breech or cephalic delivery module from the Patient Simulator.
Connecting the Clean Bleed™ Mat
Insert an absorbent pad inside the Clean Bleed™ Mat.
Close the Clean Bleed™ Mat.
Place the Clean Bleed™ Mat underneath the Patient Simulator.
NOTE
Make sure the Clean Bleed™ Mat blood inlet port is aligned with the Patient Simulator's blood inlet port.
Lift the right arm of the simulator.
Unzip the torso skin.
Unplug the torso skin.
Connect the tube labelled Clean Bleed™ Mat to the simulator’s blood outlet port.
Route the tube inside the torso skin and plug back the torso skin.
Zip the torso skin with the tube inside.
Connect the Clean Bleed™ Mat to the Clean Bleed tube.
Put the arm back in its position.
Filling and connecting the external blood tank
Fill the external blood tank with some concentrated blood and distilled water and close it.
NOTES
Make sure the tube inside the external blood tank is attached to its deadweight and the cap before closing.
The external blood tank can be hung on the bed or placed on the floor.
Lift the left arm of the Patient Simulator.
Unzip the torso skin.
Unplug the torso skin.
Connect the tube labelled External blood tank to the Patient Simulator’s blood inlet port.
Route the tube inside the torso skin.
Plug the torso skin back in.
Zip the torso skin with the tube inside.
Put the arm back in its position.